
Solar Panel Roof Mounting Systems: Types, Components & Selection Guide
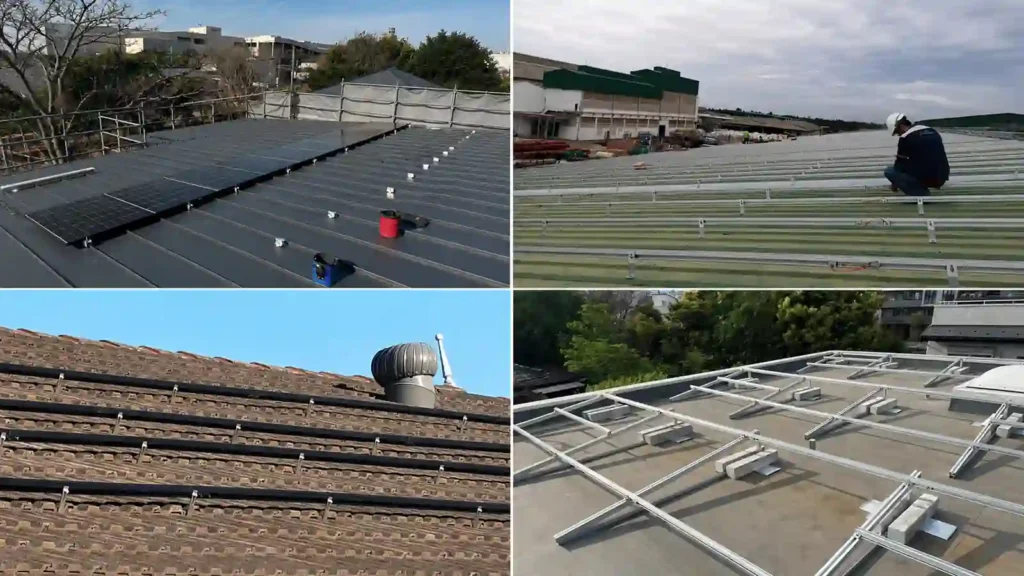
A solar panel roof mounting system is the structural connection between a PV array and a building roof. The right system must match the roof material, supporting structure, module layout, wind and snow conditions, waterproofing requirements, and installation method—not simply the panel size.
If you first need the broader context, read What Is Solar Racking? and Types of Solar Mounting Systems. This guide focuses specifically on roof-mounted PV: the main roof types, attachment methods, components, and the information needed to choose a suitable system for a professional project.
For product selection, you can also go directly to Roof Solar Mounting Systems.
Roof Solar Mounting Systems at a Glance
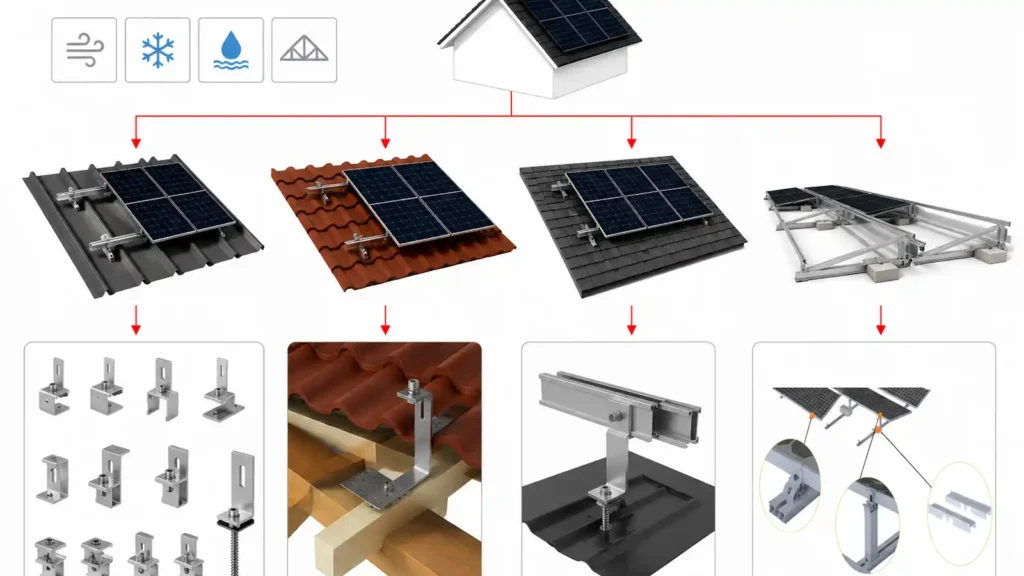
Roof-mounted PV is usually divided first by roof geometry and roof material.
| Roof Type | Common Mounting Approach | Typical Attachment | Key Project Concern |
|---|---|---|---|
| Pitched metal roof | Rail-based, mini rail or direct attach | Standing-seam clamp, L foot, hanger bolt, mini rail rack, or profile bracket | Roof profile and attachment compatibility |
| Tile roof | Rail-based | Roof hook or tile-compatible attachment | Tile clearance, structural connection and waterproofing |
| Shingle roof | Rail-based or selected direct-attach systems | Flashed structural attachment | Rafter connection and water management |
| Flat / low-slope roof | Ballasted, mechanically attached or hybrid | Ballast tray, concrete foundation, triangle solar mount, adjustable solar bracket, base plate or structural attachment | Roof load, membrane protection and wind uplift |
The basic rule is very simple: identify the roof first, then select the attachment family, and only then finalize rails, clamps and the rest of the solar panel mounting hardware.
How Does a Roof Solar Mounting System Work?
Most roof mounting systems create a structural load path from the PV module into the building.
A common rail-based load path is:
PV Module → Mid / End Clamp → Mounting Rail → Roof Attachment → Rafter / Purlin / Structural Deck
Not every roof system uses continuous rails. Standing-seam metal roofs can use compatible seam clamps with rail-based or rail-less module interfaces, while some low-slope roofs use ballasted frames that distribute loads across the roof surface.
The purpose is still the same: keep the modules in the required position and transfer dead load, wind uplift, downward pressure, snow load and other project forces into the supporting structure.
This is why roof mounting should be selected as a system rather than as a list of individual brackets.
1. Pitched Roof Solar Mounting Systems
A Pitched Roof Solar Mounting System is designed for sloped roofs such as metal, tile, shingle and selected slate roofs.
The modules are usually mounted close to the roof plane, although project-specific adjustable configurations can be used when height, alignment or tilt needs to be modified.
Typical pitched-roof components include:
- Roof hooks, L feet, hanger bolts or metal-roof clamps
- Aluminum mounting rails or short rails
- Mid clamps and end clamps
- Rail splices
- Flashing, EPDM washers or sealing components where required
- Stainless-steel fasteners
- Grounding and bonding components
- Cable-management accessories
The correct component set depends on the roof material and the structure underneath it.
Metal Roof Solar Mounting
Metal roofs are not one uniform category. Standing seam, trapezoidal, corrugated and exposed-fastened roofs use different attachment strategies.
For a detailed product overview, see Metal Roof Solar Mounting System.
Standing Seam Metal Roofs
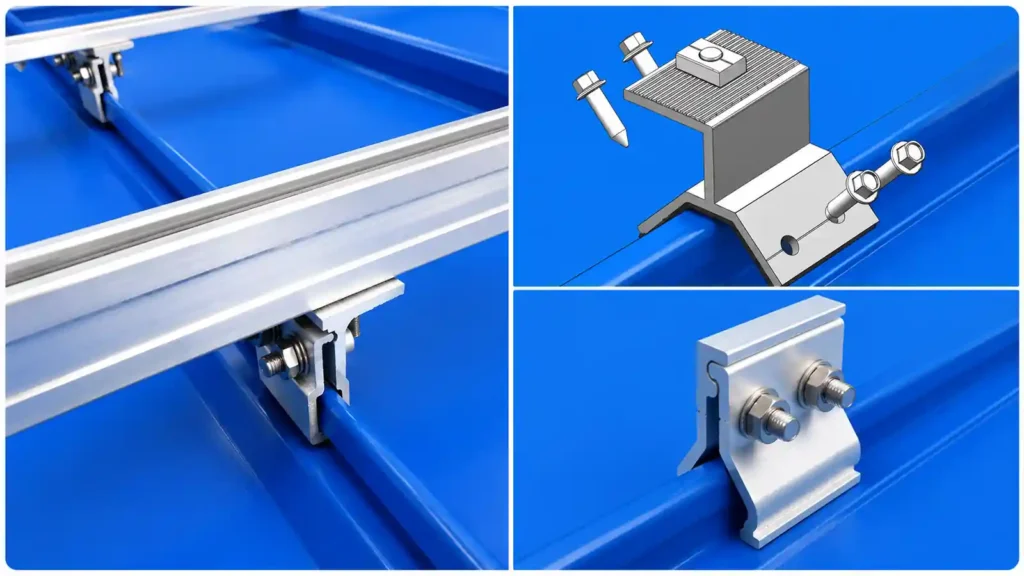
Standing-seam roofs can often use profile-compatible clamps that grip the seam without drilling through the metal roof panel. Depending on the system, the clamp can support a conventional mounting rail or a direct-attach / rail-less module interface.
The critical step is identifying the seam geometry correctly. Clamp selection should follow the actual seam profile, metal thickness, load direction and tested attachment method rather than assuming that one standing-seam clamp fits every roof.
Trapezoidal and Corrugated Metal Roofs
Exposed-fastened and ribbed metal roofs commonly use L feet, hanger bolts, roof clamps, mini rails, or profile-specific brackets. If These attachments are
normally connected through the roof sheet to a suitable purlin or other approved structural member, depending on the system design. For low-slope roofs,
triangular or adjustable mounting brackets can be used to achieve the desired tilt angle.
Where roof penetrations are used, sealing details such as EPDM washers, sealing pads or project-specific flashing must be coordinated with the roof system.
This is one reason that solar panel mounting brackets for metal roof components should be treated as a compatibility question rather than as one universal product.
Tile Roof Solar Mounting
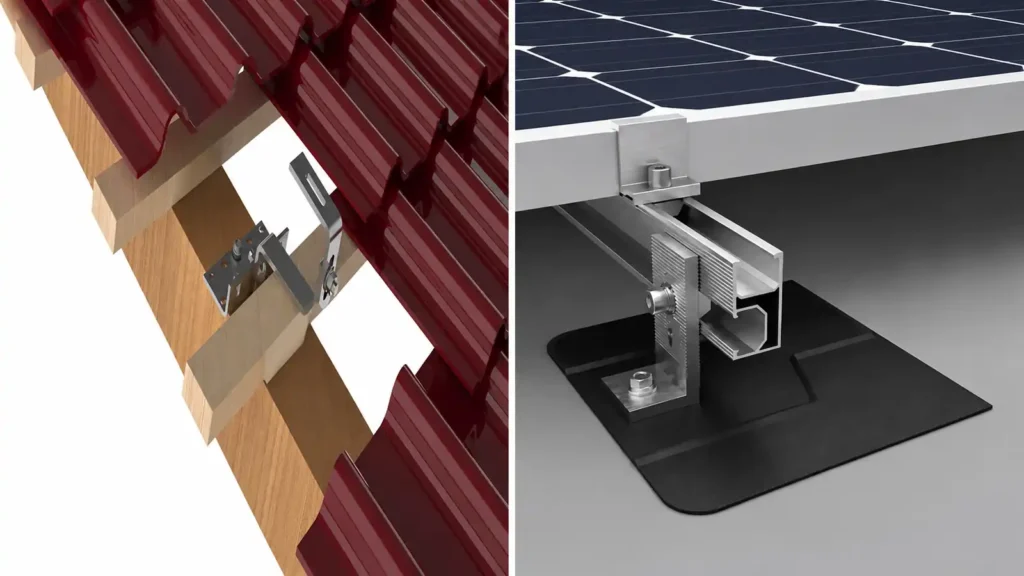
A Tile Roof Solar Mounting System typically uses roof hooks or tile-compatible attachments to connect the rail system to the roof structure below the tiles.
The main challenge is not simply holding the module. The attachment has to work around the tile while preserving the roof’s ability to shed water and avoiding unnecessary tile damage.
Project review should confirm:
- Tile type and profile
- Rafter or structural support location
- Hook shape and adjustment range
- Clearance between the hook and tile
- Rail height and alignment
- Flashing or underlayment requirements
- Module layout and clamp position
- Wind speed and snow load
Tile hooks should not be loaded against a fragile tile surface as if the tile itself were the structural support.
Shingle Roof Solar Mounting
Shingle roofs commonly use flashed structural attachments connected to rafters or other suitable framing.
A typical assembly may include a lag or structural fastener, flashing or integrated waterproof attachment, L foot or rail interface, aluminum rail, module clamps and grounding hardware.
The waterproofing strategy should not rely on exposed sealant alone. The roof attachment should be compatible with the roofing system and installed according to the applicable product and roofing requirements.
2. Flat Roof Solar Mounting Systems
A Flat Roof Solar Mounting System usually creates its own module tilt instead of following a steep roof slope.
Flat and low-slope commercial roofs introduce a different set of questions:
- Can the roof support additional ballast weight?
- Is roof penetration allowed?
- What membrane or roof surface is present?
- How will loads be distributed?
- What wind-uplift conditions apply?
- How will drainage and maintenance paths remain accessible?
- What tilt and row spacing are required?
Ballasted Roof Mounting
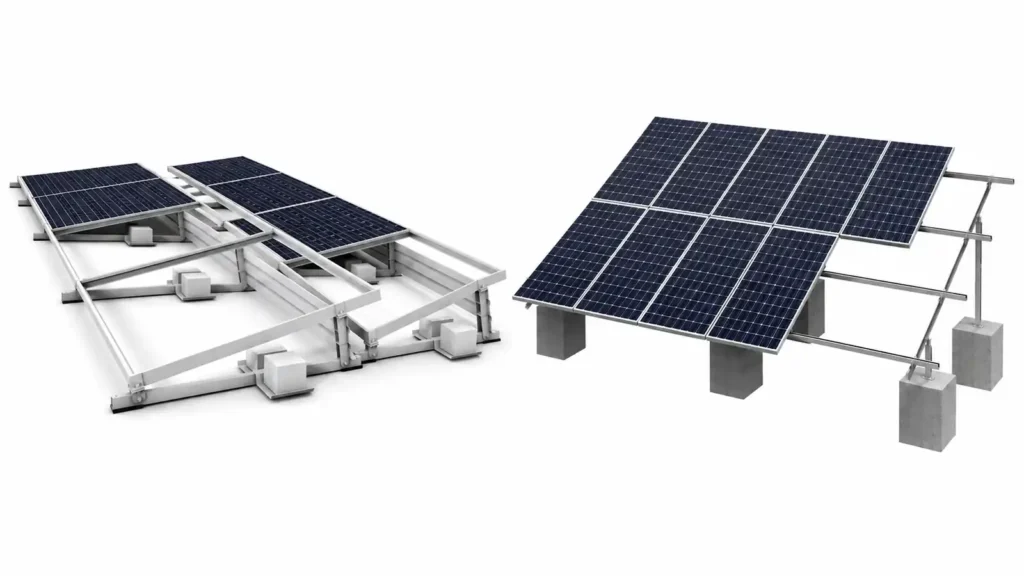
Ballasted Solar Racking uses added weight as part of the resistance against movement and uplift.
A ballasted system may include tilted support frames, ballast trays or plates, module rails or supports, clamps, fasteners and wind-management components.
The advantage is that roof penetrations can often be reduced or avoided in suitable designs. The tradeoff is additional dead load on the roof and the need to coordinate ballast distribution with wind conditions and structural capacity.
A useful project reference is the 11.55 kW ballasted flat roof solar mounting project in Japan, which used the project-specific ballast solar mounting configuration for large-format modules.

Mechanically Attached Flat Roof Mounting
Mechanically attached systems transfer loads through defined attachment points into the building structure.
This can reduce the amount of ballast required but creates penetrations or structural interfaces that need correct waterproofing and roof-system compatibility.
Hybrid Flat Roof Mounting
Some projects combine ballast and mechanical attachment. This can be useful where roof-load limits, high wind exposure, edge zones or layout constraints make a fully ballasted or fully attached approach less practical.
The final decision should come from the actual structural and roof conditions rather than from a general preference for “ballasted” or “attached.”
Rail-Based, Shared-Rail and Railless Roof Mounting
Roof systems can also be classified according to the module-support architecture.
Rail-Based Systems
Rail-based mounting uses continuous or sectional aluminum rails between the roof attachments and PV modules.
Rails provide:
- Module alignment
- A defined clamp interface
- Adjustment across module rows
- Rail-splice locations
- Cable-management attachment points
- A clear structural path between multiple roof attachments
For component selection, see Solar Panel Mounting Rails.
Shared-Rail Systems
Shared-rail mounting reduces the number of continuous rail lines by allowing compatible module edges or rows to share selected rails.
This can reduce rail quantity in suitable layouts, but the system still has to follow module clamp zones, structural spans and attachment requirements.

Railless and Direct-Attach Systems
Railless systems reduce or eliminate continuous long rails. They may use short profiles, micro-rails or direct module attachments.
They can reduce long-material handling and roof-top logistics, especially on compatible metal roof applications.

However, fewer parts do not mean fewer engineering requirements. Roof profile, attachment capacity, module frame compatibility and load distribution still have to be verified.
What Are the Main Components of a Solar Panel Roof Mounting Kit?
The phrase solar panel roof mounting kit can describe anything from a small pre-packed bracket set to a complete commercial project BOM. For professional procurement, the component list should match the roof and array rather than relying on a generic kit.
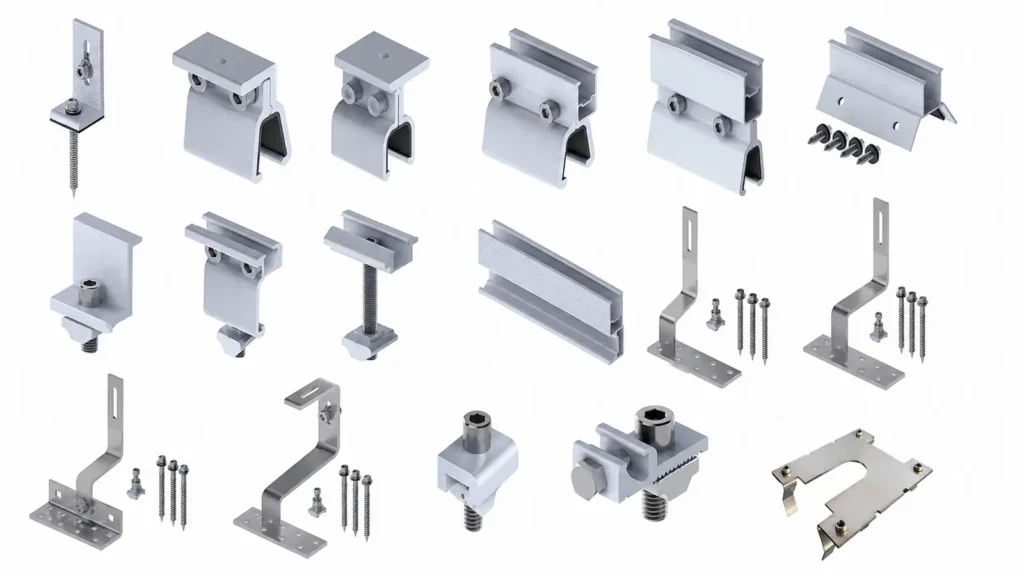
A typical complete solar mounting hardware set for a roof project may include the following.
1. Roof Attachments
These create the primary connection to the building.
Examples include:
- Roof hooks
- L feet
- Hanger bolts
- Standing-seam clamps
- Trapezoidal brackets
- Flashing mounts
- Flat-roof base attachments
2. Solar Panel Mounting Rails
Rails support module rows and transfer loads between module clamps and roof attachments.
Rail selection can depend on the material, module layout, span, wind speed, snow load, angle, profile geometry,
joint parts and splice design.
3. Middle Clamps and End Clamps
Solar Panel Clamps secure framed modules to compatible rails or mounting profiles.
Mid clamps normally secure two adjacent module frames, while end clamps are used at the outer edge of a row.
Clamp selection should depend on the modules’s type- framed solar panels or frameless solar panels, and
should also match the module frame’s height, and the approved mounting zone.
4. Rail Splices and Connectors
Long module rows often require rails to be divided into practical manufacturing and shipping lengths.
Splices connect rail sections while allowing the system to follow the required structural and expansion design.
5. Bolts and Fasteners
Roof mounting usually uses stainless-steel bolts and aluminum or stainless-steel fasteners for clamps,
rail connections, brackets and structural attachments.
For a broader hardware overview, see Solar Mounting Bolts & Fasteners.
6. Waterproofing and Sealing Parts
Depending on the roof, this can include flashing, EPDM washers, sealing pads or roof-system-specific waterproof components.
The correct detail depends on the roof covering and attachment method.
7. Grounding and Cable Management
Grounding clips, bonding hardware, grounding lugs and cable clips may be incorporated into the racking system according to the electrical and project requirements.
How to Choose the Right Solar Panel Roof Mounting System
A professional selection process should begin with roof information rather than with a bracket catalog.
Step 1: Identify the Roof Type and Profile
Confirm whether the roof is:
- Standing seam metal
- Trapezoidal metal
- Corrugated metal
- Exposed-fastened metal
- Clay or concrete tile
- Shingle
- Slate
- Flat / low slope
- Another project-specific roof system
Photos, roof profile drawings and dimensions can prevent the wrong attachment family from being selected.
Step 2: Identify the Load-Bearing Structure
The visible roof covering is not necessarily the structural attachment point.
Depending on the building, the mounting system may need to connect to rafters, purlins, structural steel, concrete or another approved load-bearing element.
Confirm spacing and structural information before finalizing attachment locations.
Step 3: Review Roof Condition and Remaining Service Life
Installing a new PV array on a roof that will require major repair or replacement soon can create avoidable future removal and reinstallation work.
Roof condition, membrane condition, corrosion, damaged tiles and existing leakage should be addressed during project planning.
Step 4: Confirm Module and Array Information
Provide:
- Module model
- Module dimensions
- Frame thickness
- Module weight
- Portrait or landscape orientation
- Modules per row
- Total module quantity
- Proposed array layout
These inputs influence rail lengths, clamp quantities, attachment positions and the complete solar panel mounting hardware package.
Step 5: Confirm Wind and Snow Requirements
Wind and snow can change rail spans, attachment spacing, ballast requirements, bracket loads and module clamp positions.
Do not choose a roof system using one generic “maximum wind speed” number without considering project conditions and the complete structure.
Step 6: Define the Waterproofing Strategy
For penetrative systems, confirm the flashing, sealing or roof-membrane detail before installation.
For non-penetrating standing-seam clamps or ballasted systems, verify that the selected approach is compatible with the actual roof and load conditions.
Step 7: Check Corrosion and Material Compatibility
Aluminum rails, stainless-steel fasteners, coated steel parts and roof materials should be selected with the installation environment in mind.
Coastal and industrial environments may require additional attention to corrosion and material pairing.
Step 8: Plan Installation and Maintenance Access
A technically strong roof system must also be practical to install and maintain.
Consider:
- Roof access
- Handling of long rails
- Pre-assembly
- Module replacement
- Drainage paths
- Roof inspection routes
- Cable routing
- Future roof maintenance
How Do Wind and Snow Affect Roof Mounting Selection?
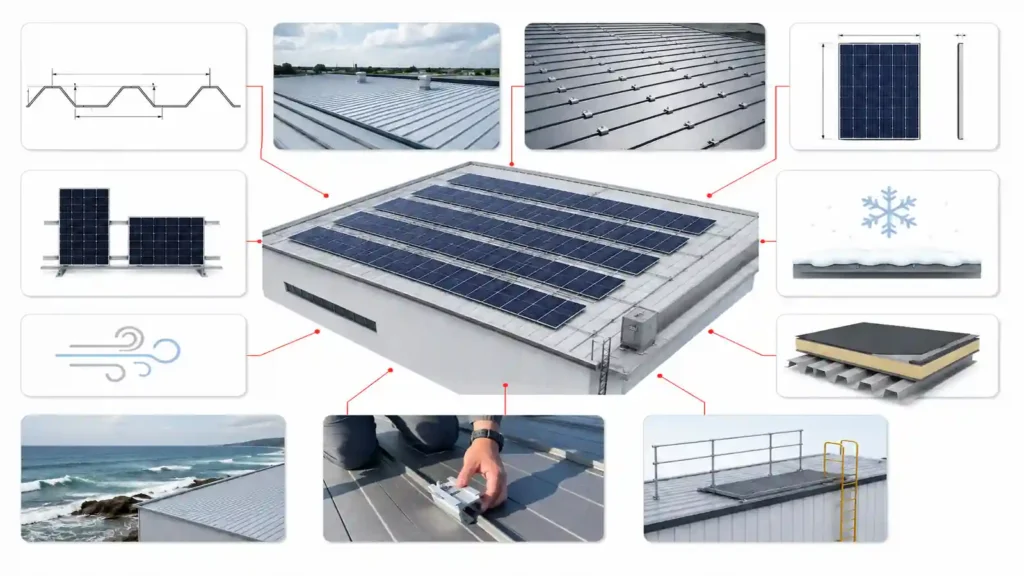
Wind uplift is especially important on rooftops because wind flow around roof edges, corners, parapets and rooftop equipment can create highly variable pressure zones.
The resulting loads can influence:
- Roof attachment quantity and spacing
- Rail span
- Clamp position
- Ballast distribution
- Structural fasteners
- Edge-zone layout
- Module support points
Snow creates additional gravity load and can accumulate unevenly depending on module tilt, roof geometry and surrounding obstructions.
A mounting system should therefore be reviewed using the project’s applicable design basis rather than assuming that every roof location creates the same load.
Common Roof Mounting Mistakes to Avoid
Selecting the Attachment Before Identifying the Roof Profile
This is especially risky on metal roofs. Similar-looking seams or ribs can require different clamps or brackets.
Treating the Roof Covering as the Structural Support
Tiles, shingles and thin sheet metal are not automatically the final load-bearing member. The load path must reach an appropriate roof structure or use a tested roof-specific connection.
Using a Generic Mounting Kit After the Module Changes
A different module can change frame thickness, clamp zones, row dimensions, rail lengths and hardware quantities.
Ignoring Waterproofing Until Installation
Water management should be part of system selection, not an afterthought after brackets are already positioned.
Ignoring Future Roof Maintenance
PV arrays should leave practical access for drainage, inspection, repair and eventual module or roof work.
Assuming Ballasted Means “No Structural Review”
Ballast adds roof load and must still resist project wind forces. A non-penetrating concept does not eliminate structural requirements.
What Information Should You Send a Roof Mounting Supplier?
To prepare a useful roof mounting proposal, provide as much of the following information as possible:
- Project location
- Roof type and material
- Roof profile dimensions or section drawing
- Roof photos
- Roof pitch
- Rafter or purlin spacing if available
- Roof structural information if available
- PV module datasheet
- Module dimensions and frame thickness
- Module quantity and layout
- Wind speed and snow load
- Preferred attachment or penetration restrictions
- Corrosion environment
- Available CAD, architectural or structural drawings
- Required delivery scope
- Estimated order quantity
- Packing requirement
This allows the supplier to move from a generic solar panel roof mount to a project-specific component set.
Common Questions About Solar Panel Roof Mounting Systems
What is a solar panel roof mounting system?
A solar panel roof mounting system is the structural hardware used to secure PV modules to a building roof and transfer loads into the roof structure. Depending on the roof, it may include clamps, hooks, L feet, hanger bolts, rails, module clamps, flashing, fasteners, ballast and grounding components.
What are the main types of solar panel roof mounts?
The main categories include pitched-roof rail systems, metal-roof clamp or bracket systems, tile-roof hook systems, shingle-roof flashed attachments, and flat-roof ballasted or mechanically attached systems.
Can one solar panel roof mounting kit fit every roof?
No. Roof geometry, material, seam or tile profile, supporting structure, wind and snow conditions and waterproofing requirements can all change the required attachment and component set.
What is the difference between a roof hook and an L foot?
A roof hook is commonly used to pass around or beneath tile roofing and connect a rail to the structure below. A L foot is a general rail-support interface commonly used with flashed attachments, hanger bolts or metal-roof mounting configurations. Exact use depends on the mounting system.
The tile roof hooks are fit for tile roof and the L feets are fit for the metal roof.
Are standing-seam solar clamps non-penetrating?
Compatible standing-seam clamps can attach to selected seams without penetrating the metal roof panel. The clamp must match the actual seam profile and project loads.
Are ballasted flat-roof systems always non-penetrating?
Many ballast-based designs reduce or avoid penetrations, but some projects use hybrid designs with strategic mechanical attachment. The final configuration depends on wind, roof-load capacity, membrane conditions and structural requirements.
What is included in a complete solar panel mounting hardware set?
A complete project set may include roof attachments, aluminum rails, rail splices, mid clamps, end clamps, fasteners, flashing or sealing parts, grounding components and cable-management hardware. The BOM should be based on the final roof and module layout.
How do I choose the right roof mounting system?
Start with roof type and profile, then confirm the load-bearing structure, module data, array layout, wind and snow conditions, waterproofing approach, corrosion environment and installation requirements.
Choose a Roof Mounting System for Your Project
The best solar panel roof mounting system is not the one with the fewest parts or the lowest bracket price. It is the system that matches the roof, creates a reliable structural load path, manages water correctly and uses components that fit the actual module and project conditions.
Explore Roof Solar Mounting Systems to compare pitched, metal, tile and flat-roof solutions, or send your project details for a project-specific component review.
References & Technical Sources
- Pacific Northwest National Laboratory / Building America Solution Center — Roof Anchor System for Solar Panels
https://basc.pnnl.gov/resource-guides/roof-anchor-system-solar-panels - U.S. Department of Energy — Life Cycle of Photovoltaic Systems: Install and Commission a Photovoltaic System
https://www.energy.gov/cmei/femp/life-cycle-photovoltaic-systems-install-and-commission-photovoltaic-system - U.S. Department of Energy — Severe Weather Resilience in Solar Photovoltaic System Design
https://www.energy.gov/cmei/femp/severe-weather-resilience-solar-photovoltaic-system-design - Pacific Northwest National Laboratory / Building America Solution Center — Flashing of Penetrations in Existing Roofs
https://basc.pnnl.gov/resource-guides/flashing-penetrations-existing-roofs - Penn State University — PV Systems Mounting Types
https://courses.ems.psu.edu/ae868/node/913

Sales Manager at Easy Solar Solar Mounting Systems. With over 1o years of experience in the solar industry, I specialize in providing reliable andcost-effective mounting solutions for distributors, installers, and EPC companies. Experienced in intemational sales and commited to building long-term partnerships worldwide.